Chicken liver pâté

Chicken Liver Pâté Sandwich

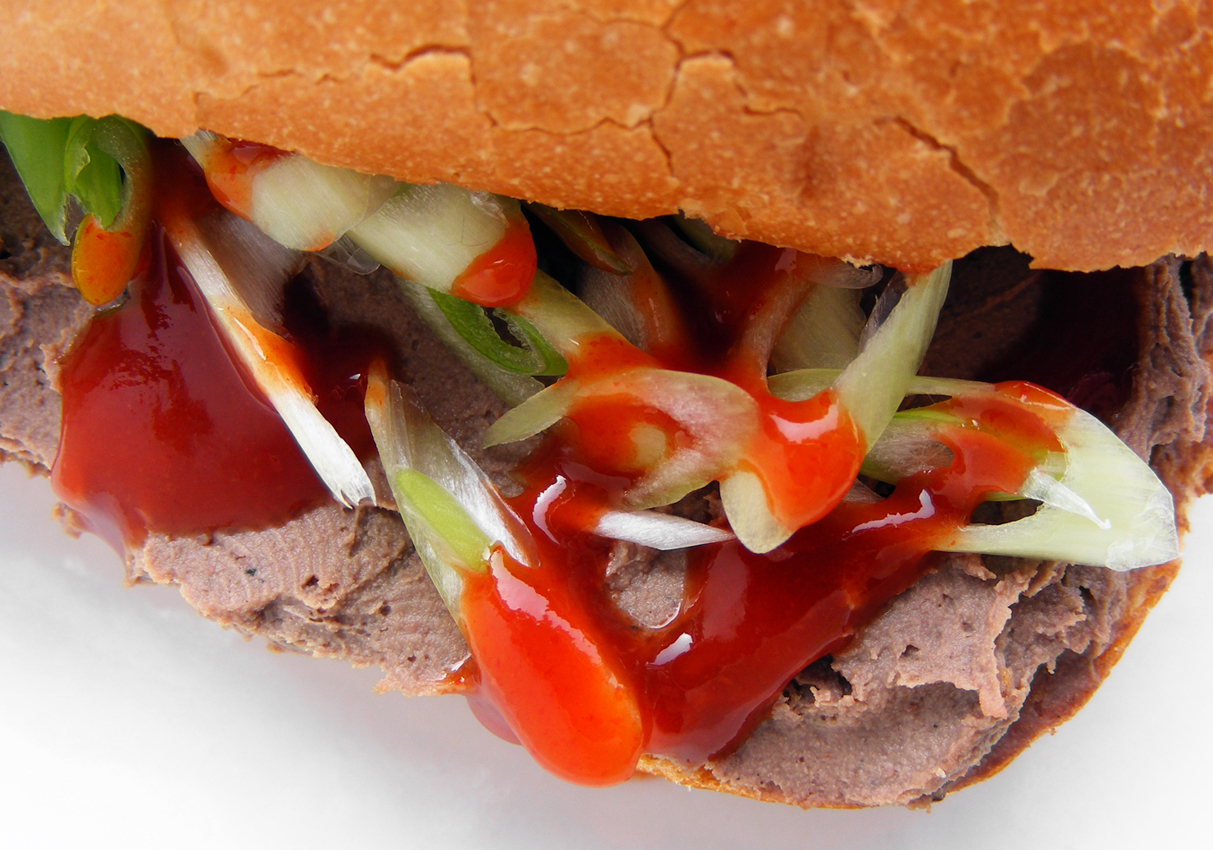
Homemade chicken liver pâté. Easy, cheap but special. This time I was inspired by a foie gras starter we had this summer in France. The chef added a little quatre épices which I liked very much. The problem with chicken liver pâté is that I normally have enough of it quite easily. But today I discovered that with some sriracha chili sauce I will never get satisfied, always eager for more.

Ingredients
500g chicken livers (rinsed and white, yellow & green bits removed)
100g butter
1 shallot
75 ml white port (or madeira, cognac, shaoxing etc)
75 ml cream
1 t salt
1 t freshly ground pepper
pinch of ground cloves
pinch of ground cardamom
2 pinches of cayenne pepper.

Directions
Saute the chopped shallot in some of the butter.
Then add the chicken livers.
Add the salt and a tiny pinch of ground cloves (kruidnagel in dutch), ground green cardamom and some cayenne pepper.
Saute the livers in about 4-6 minutes until done but still pink in the middle.
Transfer to your blender (or a bowl to cool down if your blender is plastic)
Deglaze the pan with white port and let it reduce.
Take the pan off the heat, add remaining butter.
Let it cool. Then add to the blender.
Blend until smooth. Pass through sieve.
I whipped the cream and carefully mixed the two when the chicken liver was cooled down enough but I think you can just as well add the cream (unwhipped) to the blender.

Chicken Liver Pate Recipe
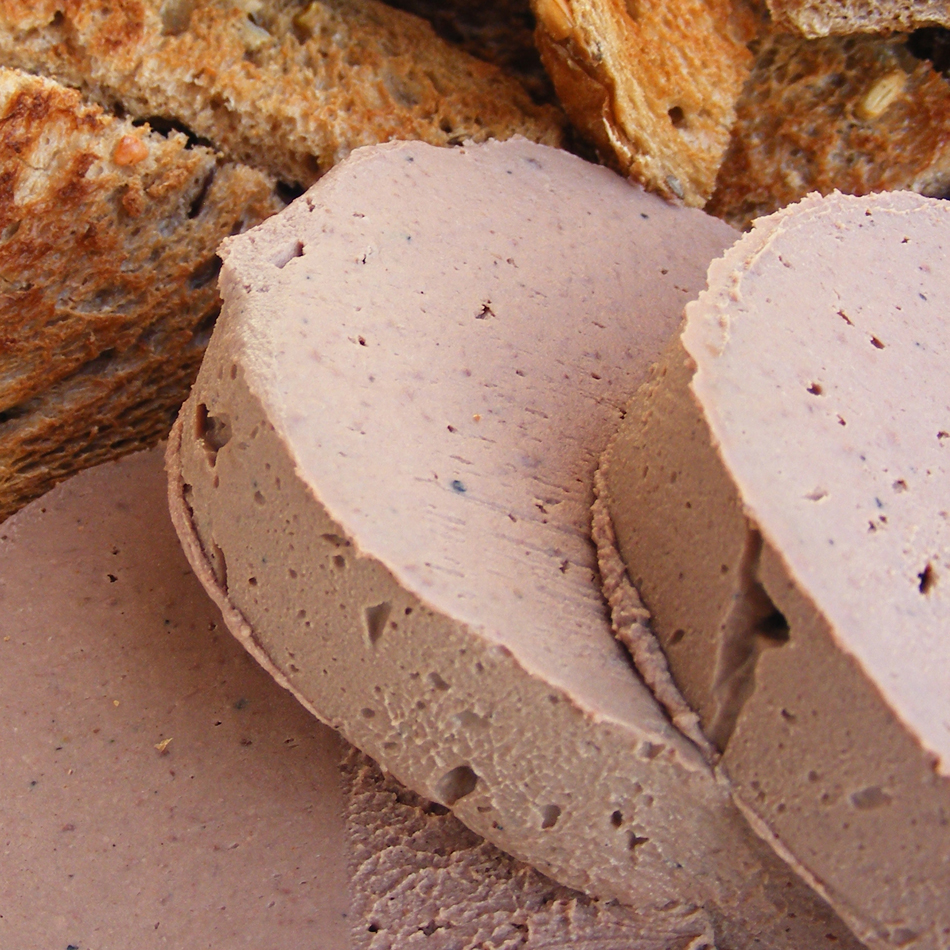
Put in one or more decorative jars.
(I used a pâté mold but I wouldn’t bother again, no matter what shape, chicken liver pâté is never going to look pretty)
Cover with cling film to prevent discoloring.
Put in fridge and wait at least 12 hours until set.

Like I said, I’ve made this before and it’s always a bit “much”, a bit “heavy”. Normally I can’t finish the batch. But today I discovered that with (spring onion and) sriracha chili sauce this chicken liver pâté is awesome.

Posted in Chicken, Homemade, Sandwiches | 2 Comments

Chicory and Chicken Salad

Witloof, apple, grapes and Chicken Salad

Not the most simple salad because of all the ingredients, but not that complicated either.
I particularly like this salad when I'm hungry on a hot summer day. Substantial, but still light and refreshing because of the crunchy apple, the sweet grapes, the bitter chicory (witlof / witloof / dutch endive), the sour yoghurt dressing with the hint of honey. The chicken gives it body.

RECIPE

  • MARINATE & GRILL THE CHICKEN
    (you can do this well in advance or use leftover chicken)

    Cut 300g chicken breasts in 3cm thick strips.

    The marinate can vary, this time I used:
    3 T peanut oil
    2 T finely chopped onion
    1 T chopped fresh thyme
    1 T lemon juice
    1 T shaoxing rice wine
    ½ t ground cumin
    ½ t fenegreek seeds
    freshly ground pepper

    Marinate for a couple of hours. Then grill for about 5 minutes or until done. Let it cool down and slice in bite-size chunks. Set aside or refrigerate until needed.
     

  • MAKE THE DRESSING
    Mix together and set aside:
    4 T Greek yogurt
    1 T mayonnaise
    1 T honey
    1 T lemon juice
    Salt/pepper

     
  • CHOP & ASSEMBLE
    Cut 4 heads of chicory into thin slices. Remove the cores.
    (this left me with about 300g of sliced chicory)
    Mix the chicory with some of the yogurt dressing. (you might not need all of it)
    Cut 150gr of white, seedless grapes in quarters and mix with the chicory.
    Cut 1 granny smith apple in julienne strips and mix with the chicory.
    Add the pieces of grilled chicken.
    Serve and enjoy.


Optional: add some pinenuts, walnuts or pecan nuts:
Witlof Salad with chicken and pinenuts

Posted in Chicken, Salads | Tagged , , , , | Leave a comment

Garnalenkroketten (Dutch Shrimp Croquettes)

Garnalenkroketjes

The croquette is a very typical dutch snack, we eat about 18 croquettes per person per year. Although those are mainly beef croquettes, this version with shrimps is more popular in Belgium. The principle is very simple: you make a roux and add cooked shrimp (or meat or whatever). You add gelatin as a trick to help the roux get firm in the fridge, you won’t taste it in the finished product. Mold croquettes in your hands, dust with cornflour, roll in egg-white and cover with breadcrumbs, deep-fry and that’s it! In this recipe it’s really worthwhile to use the typically dutch brown shrimp.

Peeled Brown shrimp


INGREDIENTS
4 gram gelatin sheets
90 gram butter
120 gram flour
300 gram chicken stock
500 gram peeled brown shrimp
pinch of cayenne pepper
pinch of garlic powder
salt
pepper

panko breadcrumbs
egg-white
oil for deep-frying

MAKING THE ROUX
Soak the gelatin sheets in cold water for about 5 minutes.
Slowly melt the butter in a heavy-bottomed saucepan.
When butter has melted, add all flour at once.
Stir with a rubber spatula.
(using a whisk would release the starch, making it sweet)
Heat the mixture for about 3 minutes or until you feel the rawness of the flour is gone. This is an important step, if you don’t cook it enough the croquette will taste of flour, it’s better to be safe than sorry.
Gradually add the (cold) stock, stir and bring to the boil.
(do stir well, it will release gluten for optimal “binding”)
Squeeze the soaked gelatin and stir into the mixture.
Add cayenne, garlic powder, salt and pepper and let the mixture cool a little.
Then carefully mix in the shrimp. Don’t stir too much now.
Taste the mixture and add salt, pepper, etc if needed.
Line a baking tray with cling-foil, add the mixture in a layer of about 3 cm thick, cover with clingfilm (clingfilm touching the mixture), let it cool (as quickly as possible) and transfer to your fridge. Ideally, you let the mixture rest for a day to let the flavors “mix and marry”.

MAKING THE CROQUETTES
Cut the mixture already in the shape of croquettes. Pick up the now square croquettes one by one and mold in your hands into a nice, round croquettes.
Dust them with (corn)flour.
Roll in beaten egg-white.
Roll in breadcrumbs.
Deep-fry for about 2-3 minutes at 180°C.
(or about 5 minutes when frozen)

RECIPE SOURCE
Het Groot Culinair Croquetten Kookboek van Edwin Kats

NOTES
(mainly for my own reference)

  • I used bapao flour, which is low in gluten. I’m not even sure if it’s “better or worse” to use, normally you’d use all purpose flour.
  • I was short on stock, so I used some dry white wine too. (about 100ml?)
  • I added 2 teaspoons of freeze dried yuzu and some chopped parsley. Normally you’d just squeeze some lemonjuice over he shrimps.
  • I used panko, Japanese breadcrumbs. And I coated the croquettes twice, so adding another step of rolling in eggwhite and panko again.
  • I froze them after I dusted them in cornflour. You could also freeze them including the panko, but you get a much nice result when you roll them in panko just before deepfrying.

VARIATIONS
with cheese, left-over “man & wife tongue” or braised beef:

Cheese CroquetteHomemade CroquetteBitterballen

Posted in Other Snacks, Shellfish | Tagged , , | 3 Comments

Grilled Eggplant Salad

Grilled Aubergine Salad recipe

Together with Fish frangrant eggplant and Thai coconut scented eggplant this is my favorite eggplant recipe. Especially in summer. It’s pretty simple, it’s just a bit of work to grill all the eggplant slices if you just have the one griddle pan. But if you’re a little bit practical, you can do this during the preparation of the other dishes. Anyway, I think it’s totally worth the trouble!


RECIPE
for 2-4 person

600g Asian eggplants (the thinner kind)
5-8 T nice vegetable oil
1 T lime juice
½ clove of garlic, grated
1 tiny pinch of ground cumin
2 spring onions, chopped
5 T cilantro, chopped
fresh chili, chopped (optional, not in this photo)
salt
pepper

  • Slice the eggplants into thin (2mm) slices. Preferably with a mandoline slicer. Grill them (in batches) in a griddle pan or on the bbq. Don’t use any oil.
  • Make the vinaigrette/dressing with all other ingredients and put in a salad bowl. Taste and adjust it. Little bit more salt, lime juice, etc
  • Add the grilled slices of eggplant to the bowl and mix with the vinaigrette. When grilling in batches, keep adding every warm batch into the bowl and mix it with the rest so it can soak up the vinaigrette. Eat warm or luke warm
  • Posted in Salads, Side Dishes | Tagged , , , , | Leave a comment

    Melon, strawberry and chili flakes salad

    Spiced Melon & Strawberry Salad

    Another one of my most favorite salads. Pretty simple, but pretty good. Perfect for a summer’s day and my entry for the dutch foodblogevent which theme is strawberries!

    For the salad:
    1 melon
    250g strawberries
    1 banana (optional)

    For the dressing:
    50 ml ginger syrup
    10 ml white balsamic vinegar
    pinch of chili flakes (just enough to give it a subtle kick)

    That’s it!

    Posted in Dessert, Salads | Tagged , , , | 1 Comment

    Tomato and Avocado Salad

    Salad with tomato, avocado, onion, cilantro and an asian dressing

    One of my favorite if not most favorite salads. I eat it with steak or fish or just about everything. Make sure the avocado is nice and soft and the tomatoes have as much flavor as possible.

    For the salad:
    200g (cherry) tomatoes
    1 avocado
    1/2 red onion
    3 T chopped, fresh coriander

    For the dressing:
    juice of 1 lime
    1 T light soysauce
    1 T fishsauce
    1 T olive oil (optional)
    1 t sugar

    Mix the ingredients for the dressing in a salad bowl. Taste and adjust if necessary. Dice the onion pretty finely, the coriander roughly, add to the bowl and mix. Cut the tomatoes and avocado in smaller but similar pieces and add to the bowl. You might want to mix everything without the avocado first, to keep it neater.

    Posted in Salads | Tagged | 3 Comments

    Steamed Oysters with black beans

    Steamed oyster with tausi
    I used to think you should only eat oysters plain and raw. Maybe with a pinch of chopped shallot and a few drops of red rice vinegar, but nothing more. This however, was before I knew about the Chinese way of eating oysters: steamed with little black beans and a nice soy sauce dressing. I couldn’t choose anymore what my favorite is, I love them both ways. Recipe for a dozen oysters:


    For the sauce, mix together:
    1 T light soy sauce
    1 T Shaoxing rice wine
    1 T clear rice vinegar
    2 T water (or some nice chicken stock if you have)
    1½ t sugar
    2 t sesame oil

    Rinse a tablespoon of fermented black beans (tausi) and set aside.

    Scrub the oysters if they’re still sandy. Open them, cut the oyster loose, but leave them in the half shell. Arrange them an a plate that will fit in your steamer. For stability you could take some tinfoil and mould them into little circles on which you strongly put the oysters. Put about 5 little black beans on each oyster, then pour it with the sauce and steam for about 3-5 minutes until they’re warm and firm up a little, but aren’t completely cooked. Sprinkle with some finely chopped spring onion and serve.

    NB Dit recept kun je ook in het Nederlands lezen op: Aziatische-ingrediënten.nl

    Posted in Shellfish | Tagged | 1 Comment

    Piperade with smoked peppers

    Cute piperadeI don’t know why bell peppers (paprika’s in dutch) hardly ever seem to play the leading role in (my) recipes, but in this Spanish inspired recipe they do. It’s not the quickest recipe, but it is easy and you can do most of it well in advance and pop it in the oven just before serving. Normally I make 1 or 2 medium size ovendishes, but today I used tiny little pots and quail eggs instead of chicken eggs. So it wasn’t just delicious, it looked cute too.


    RECIPE

    600g pointed, red peppers (any color or size will do)
    1 onion, thinly sliced
    2 cloves of garlic, finely chopped
    2 dl passata
    handful of basil, sliced
    2 eggs
    4 t cream
    pinch cayenne pepper

    Wash the peppers. Cut off the head and slice lengthwise in half.
    If you have a stovetop smoker, smoke the peppers (skin sides up) for about 10-15 minutes. But don’t worry, without smoking them the result will be worthwhile too. Or maybe you could add some Spanish smoked paprika.
    Take peppers out and slice in 5mm thin slices.
    Slowly saute the onion and garlic in some oil for about 5 minutes until translucent.
    Add the sliced peppers and saute for another 5-10 minutes.
    Add the passata, season with salt & pepper (or chickenstock powder) and simmer for 5 minutes.
    Divide the mixture in 1 or 2 oven dishes.
    Push a hole/ditch in the middle and carefully break an egg in it.
    Add 1 or 2 teaspoons of cream and a dash of cayennepepper.
    Put in a 180°C oven for about 12-15 minutes.
    If the mixture was prepared before and cold I would heat it up (in the oven) before adding the egg. But that’s because I like my egg to be runny.

    Serve with bread or pasta.

    Posted in Main Dish, Side Dishes | Tagged , , , , | 2 Comments

    Filet Américain

    Filet Americain with Onions

    Different from what the name suggests, this is a very typical dutch sandwich spread. I know that in France and Belgium they mean something else with “filet américain”, something the rest of the world calls “steak tartare”, but I’m dutch and this is what dutch people call filet américain. When I was young this was a luxurious treat for special days, nowadays it’s a cheap, day-to-day spread from the supermarket. Their recipe “degraded” so much over the years I decided to start making my own. After all, it’s dead simple, anybody with a blender can do it. I like it with finely chopped raw onions on top and lots of freshly ground black pepper. Spread on a sandwich or going back to the seventies and spread it on some celery sticks!
    Ingredients

    RECIPE

    225 gr lean beef
    3 T kewpie mayonnaise
    2 t mustard
    1 t paprika powder
    ½ t salt
    ½ t ground black pepper
    ⅛ t curry powder
    pinch of cayenne-pepper
    10 drops of Worcestershire sauce

    Dice the beef and add with all other ingredients to your blender. Blend for quite some time, it really has to become a smooth paste. Taste it and see if you need to add some more spices or salt. Eat the same day, I wouldn’t keep it for longer than 24 hours. Refrigerated of course.

    Any lean beef will do. You just don’t want any strings of fat in it because that won’t blend. It doesn’t need to be the most expensive cut, flank steak (bavette) will do just fine. I recommend Kewpie mayonnaise because it’s nice and sour. You can use raw egg yolks instead or a sweeter brand of mayonnaise, but then you might want to add some lemonjuice or vinegar. I use wholegrain mustard from Limburg and “Kerry Djawa” currypowder.

    Filet Americain on Celery

    Posted in Beef, Homemade, Sandwiches | Tagged , , , | 33 Comments

    Fish Fragrant Eggplant

    Fish Fragrant Eggplant

    Another classic from Sichuan. There’s no fish or fragrance of fish in there, it’s just a reference to the sauce that originally was used in a famous fish recipe. Like most classics there are hundreds of variations on the dish, with or without meat. I use Ken Hom’s recipe but I skip the deep-frying part, which makes it a easier, quicker and lighter. Maybe not as buttery and velvety, but still very delicious. We eat this regularly.


    RECIPE

    Stir-fry for 3 minutes or until nicely browned:
    400 gr minced pork (or beef)

    Add and stir-fry for another minute or two:
    2 T chopped garlic
    2 T chopped ginger
    3 T chopped (spring) onion
    (no need for spring onion)

    Add and bring to the boil:
    1,25 dl water or chicken stock
    2 T dark soy sauce
    3 T Shaoxing rice wine
    3 T Chinese black vinegar
    (sweet black vinegar is nice too)
    2 T sugar (or less when you used sweetened black vinegar)
    1 T Sichuan pepper (roasted and ground)
    2 t chili-beanpaste (toban jiang)
    1/2 t grounded black pepper

    Add and simmer until soft and tender:
    500 gr Asian eggplant (in pieces)

    Just before serving, add a little cornflour mixed with some cold water to thicken the sauce. Finally add:
    2 t sesame oil
    spring onion
    for garnish

    Simply serve with white rice.

    NB Dit recept kun je ook in het Nederlands lezen op: Aziatische-ingrediënten.nl

    Posted in Beef, Main Dish, Pork | Tagged , , , , , , , , , , , , , , | 30 Comments

    Grilled Beef with Hoisin Salad

    Tomato, cucumber, beef salad

    Tomato, cucumber, red onion and beef sounds a bit boring for a salad. That’s probably why we only eat this salad about once a year. But every time we do I’m pleasantly surprised, thinking: “We should eat this more often!”. And what better way to remember than blogging about it?


    RECIPE

    For the salad:
    250g cherry tomatoes, quartered
    250g little cucumbers, sliced thinly
    ½ red onion, sliced thinly
    big handful of chopped coriander
    2 T toasted sesame seeds
    300g steak, grilled and sliced (duck breast is also nice)

    For the dressing:
    1 T hoisin sauce
    1 T light soy sauce (like Kikoman)
    2 T sesame oil
    ½ T honey
    ½ lime, juiced
    1 t chopped fresh chilli

    Carefully mix the salad ingredients together, then add the well-mixed dressing. That’s it.

    From: Crisp (Crispy) by Marie Claire.

    Posted in Beef, Salads | 10 Comments

    Thai Coconut-Scented Eggplant

    Thai Coconut-Scented Eggplant

    Another “classic” in our home. Quick, easy but still very, very tasty. I really recommend the thinner, lighther purple Asian eggplant, but regular eggplant works too. You could pan fry the slices of eggplant before you add them to the sauce, but I don’t see the need in that.

    RECIPE

    450 eggplant, sliced in 1 cm slices
    2 cloves of garlic, chopped finely
    ½ t fresh ginger, grated
    1½ t clear rice vinegar
    1 T fine chili sauce (or sambal oelek)
    2 T fish sauce
    4 dl coconut milk (tinned, unsweetened)
    1 t (palm)sugar
    1 lime, juiced
    4 spring onions, thinly sliced

  • Heat a tablespoon of oil in a hot shallow saucepan with lid (hapjespan) and stir-fry the garlic, ginger, vinegar for about a minute or so.
  • Add the coconut-milk, chili sauce, fish sauce and sugar and bring to the boil.
  • Add slices of aubergine, add lid and simmer for about 8 minutes or until the eggplant is soft.
  • I like to thicken the sauce a little with a teaspoon or two of cornstarch mixed with some cold water.
  • Add the lime juice (always at the end, otherwise it could turn bitter)
  • Taste and add fish sauce, sugar or lime juice if needed.
  • Sprinkle with spring onion and serve.
  • Serve with white rice and simply stir-fried chicken to which you add a little Shaoxing rice-wine in the end. Fish or shrimp could work too. Slices of duck breast didn’t work, in my opinion.

    From: A Passion for Vegetables (Wereldse Groenten) by Paul Gayler.

    Chinese Aubergine

    Posted in Main Dish | Tagged , , , , , , , | 15 Comments

    Cooking sous-vide at home

    Sous-Vide at Home

    If you don’t want to spent thousands of euro on a professional waterbath (Roner) or even a hundred or two on a temperature controller (SousVideMagic) for your ricecooker or crockpot, then this might be something for you too: an electrical canner. The one on the photo is used to be regularly on sale at Lidl for just 30 to 40 euro.

    Okay, it’s not to the 0.1°C precise like a real Roner, but the 3°C or 4°C fluctuation up and down is good enough for me. You don’t have to keep an eye on it and it’s save to leave the house or go to sleep. The only real drawback might be the size, it’s rather big for an average kitchen.

    To use it, set the temperature you want and fill it with hot water from the tap, measure the temperature with an external kitchen thermometer and add boiling (or cold) water to reach the desired temperature. Leave it for a bit to see if the temperature is stable and then throw in your vacuum sealed food. Easy as that. I’ve been using it for quite some time now. Not that often, but I’m still pleased with it. This is my latest favorite:


    RECIPE

    500g white asparagus
    3 T (clarified) butter
    pinch of salt
    pinch of sugar

    Peel the asparagus and trim 2 cm or more of the ends.
    Line the asparagus in a single layer in a bag.
    Heads up, towards the opening.
    Add butter, salt and sugar.
    Seal the bag and cook for 30 minutes at 85°C.

    They might seem too crunchy at first sight, but they’re just perfectly soft and tender. Simply serve with boiled egg, ham and the butter it’s cooked in. Or better, make a hollandaise sauce!

    PS Thomas Keller uses a splash of milk instead of the butter, but my vacuum sealer can’t handle liquids. I’ll try freezing some milk next time, but I guess when you serve your asparagus with a buttery sauce anyway, it won’t make much difference, butter might even be better.

    Vacuumpacked White Asparagus

    Posted in 8 Equipment, Side Dishes | Tagged , , , , , , , , , , , , , , , , , , | 4 Comments

    Whiskey Chocolate Brownies

    Whiskey Chocolate Brownies
    Although I only baked it twice, this mudcake a.k.a brownie recipe is already proven a big hit. Maybe it’s the whiskey that makes even men drool?


    RECIPE

    For the cake
    250g butter, chopped
    200g dark chocolate, chopped
    375g caster sugar
    250ml whiskey (or 125ml whiskey + 125ml water)
    1 T instant coffee granules
    185g plain flour
    60g self-raising flour
    40g unsweetened cocoa powder
    2 eggs, beaten until fluffy
    3 tablespoons whiskey, extra for sprinkling

    For the chocolate glaze
    80ml cream
    90g dark chocolate

    Preheat the oven to 160ºC. Grease a 20cm square tin and line the base and sides with baking paper.

    Dissolve the instant coffee powder in a few heated/hot tablespoons of the 250 ml whiskey and put with the butter, chocolate, sugar and whisky in a saucepan that you can hang in another pan with boiling water to heat au bain marie. Just be patient for everything to melt. It will melt by itself and it will become a beautifully consistent, thick sauce.

    Sieve the plain flour, self-raising flour and cocoa into a large bowl. Pour the butter mixture onto the flour mixture and whisk until just combined. Whisk in the eggs. Pour into the prepared tin.

    Bake for about 1 hour 15 minutes, or until a skewer comes out clean when inserted in the centre of the cake. It all depends a bit on size of the tin you use, I guess. I’m not an experienced baker, so just keep an eye on it. When ready, pour the extra whiskey over the hot cake. (I pinched it all over with a toothpick before pouring the whiskey) Leave in the tin for 20 minutes, then transfer onto a wire rack placed over a baking tray to cool completely.

    For the chocolate glaze, put the cream and the chocolate in the small saucepan and heat over another pan with boiling water au-bain-marie. Again, just be patient it will melt by itself. Stir until a nice, consistent chocolate sauce. Then set aside to cool and thicken a little. Spread the glaze over the cake, allowing it to drizzle over the sides. Leave to set. Or do what I did, I sliced the cake it cubes/brownies and dipped those into the glaze.

    Tip 1: you can freeze the (unglazed) cubes individually and just take out one or two for coffee.
    Tip 2: I used Famous Grouse, but if you want an expert opinion on what whiskey to use, check out the suggestions on this blog: Aaron’s Food and Wine Musings

    Whiskey Chocolate Cake

    Posted in Dessert | Tagged , , , , , , , , , , , , | 22 Comments

    Oven-Roasted Vegetables with Tabil

    Oven-roasted Vegetables with Tabil

    I love the bold flavors of the spices with the soft and smokey flavors of the vegetables in this dish. It’s a bit of a hassle to grill all the slices if you just have the one griddle pan, but the advantage is that you can do it well in advance. No stress involved. Could be a great side dish for a BBQ. We often eat it with duck breast.
    RECIPE

    1 courgette
    1 aubergine
    1 bulb of fennel
    1 red bell pepper
    1 red onion
    8 cherry tomatoes

    Slice the vegetables, except the tomatoes, in 1 cm thick slices and/or wedges. Drizzle with vegetable oil to coat the vegetables. Or how I like to do it: pour a tablespoon of oil in your hands, rub palm to palm, then rub the vegetables with your greasy hands. Yes, you get your hands dirty, but I think the vegetables get more evenly coated, using less oil, getting a better result. So that’s how I do it. Sprinkle with a little salt.

    Then grill the vegetables, except the tomatoes in a hot grill pan for about 1-2 minutes each side or until charred. You probably have to do it in batches. Collect the grilled vegetables in an oven dish. When all vegetables, except the tomatoes are grilled, mix it with the marinade (“Tabil”) of:

    1 T coriander seeds (grind a little in mortar and pestle)
    1 t caraway seeds (grind a little in mortar and pestle)
    2 cloves of garlic, grated or pressed
    1/8 t cayennepepper
    1/8 t currypowder (hot madras)
    ½ t ground cumin
    3-10 T olive oil (depending on your oil-phobia)

    Let the warm vegetables marinate with this “Tabil” for at least an hour. Before serving, transfer the dish to a 180°C oven and roast for about 30 minutes. Just before the end, add the cherry tomatoes.

    From : A passion for Vegetables by Paul Gayler.

    Leftovers of this dish are a nice addition to a simple salad:

    Leftover Grilled Vegetables Salad

    Posted in Side Dishes | Tagged , , , , , | 1 Comment

    Kimchi Consommé

    Oyster with Kimchi Consommé

    If you’re an oyster purist and only ever want to eat them naked, then please go away. If you’re less rigid and also enjoy them with a splash of red wine vinegar and some chopped shallots, this might be something for you. When I first read about the idea of serving fresh oysters with kimchi consommé (on Momofuku for 2) I knew I had to try it. It just sounds brilliant and besides that, dead-easy to make at home. I was already familiar with the process of clarifying through ice filtration, so when we were having left-over kimchi the other day I knew what to do.

    I couldn’t find the exact recipe online and because I read somebody (Ulterior Epicure) was disappointed by the weakness of the brine I decided to add as little water as possible. Just enough to dissolve the gelatin. So this is what I did (before I discovered Chang uses more like a chickenstock than just plain kimchi, ha! But I’m not sorry, because I think it works anyway):


    RECIPE

    400g mat kimchi
    gelatin
    1T clear rice vinegar (or white wine vinegar)
    1t sugar

    Combine the kimchi, rice wine vinegar and sugar into a liquidizer. Puree as smooth as possible. Measure to see how much milliliter of liquid you have. Take about half of the required gelatin sheets needed to make a pudding/jelly of this amount of liquid. (half is enough because you don’t need it to really set like a pudding) Soak the gelatin sheets in cold water, squeeze them and dissolve into a tiny bit of hot water (50ml?) in a small saucepan. Whisk this into the kimchi-liquid. Freeze it.

    Then about 2 days before you need the consommé, take it out of the freezer. Hang a colander/sieve in a bowl and line it with cheesecloth/muslin. (a clean handkerchief will do too) Add the frozen kimchi and place it in your refrigerator or a cool place. Wait for a day or two and voilà: perfectly clear, beautiful consommé. (not much though! I think I ended up with about 100ml or 150ml)

    The consommé tasted really lovely, like the essence of kimchi. And it does go really well with fresh oyster, like red wine vinegar. I think it’s a brilliant idea, but now I discovered another dish using this kimchi consommé: a bowl of warm kimchi consommé with braised pork belly, oyster and wilted greens. That’s next on my list and I expect it to be even better!

    Making Kimchi Consommé

    Posted in Shellfish | Tagged , , , , , , , , , | 5 Comments

    Amateur Food Photography

    Improvised Photo Studios

    People regularly ask me about my photos or my camera. I don’t have a fancy camera, it’s just a Fuji Finepix S5700 with 7.1 megapixels. And although I’m quite happy with it, it has one major drawback over the camera I had before: when it’s dark, the camera will adjust the ISO! I hate that! And there is no easy way to stop my camera from doing that and trusting me I will keep it steady. I should learn to operate it manually. But I still haven’t. I think photoshop is easier. So, my camera is always on automatic, macro and no-flash. That’s it.

    The best photos, I make in my window sill on a cloudy day. With an old piece of linoleum glued on two pieces of multiplex for a background. When the sun is shining I close the blinds. And when the sun has set, I use this little photo studio I created in a corner of my kitchen closet with three 150 Watt halogen lights with one switch. Not as nice as natural light of course, but most of the time its quite acceptable.

    The window sill photos are often too blue, the closet studio photos are often to yellow or reddish. Nothing a little photoshop can’t fix. And oh, I like extending the plate with the clone pencil. So it looks like I have huge, trendy dinnerplates. :-)

    Blog-Fruit

    Posted in 8 Equipment | Tagged , , , , , , , | 5 Comments

    Tomato Chilli Jam

    This jam sounds stranger than it is. Actually, it’s just a cross between ketchup and sweet chili sauce, which probably doesn’t sound very appealing either. Hmm, it’s nothing pretentious, it’s just a surprisingly nice condiment for cheese, (toasted) cheese-sandwiches, chicken, pork, eggs or anything you can think of. Combines perfectly with coriander. The original recipes tells you to only blend half of the tomatoes and add the other half in small cubes afterwards, but I like my jam to be smooth, so I blend all tomatoes.


    RECIPE

    500g very ripe tomatoes
    4 cloves of garlic, peeled
    4 red chillies (or more or less)
    2 t finely chopped ginger
    30ml fish sauce
    300g caster sugar
    100ml red wine vinegar (I used Chinese red vinegar)

    • Blend the skinned, whole tomatoes in a food processor along with the garlic, chillies, ginger and fish sauce until the mixture reaches a puree consistency. I blended it for about 2 minutes. (because you need the pits in the tomatoes for their pectin, we won’t sieve the mixture and that’s why I prefer to skin the tomatoes. If you’re less fussy, then don’t bother)
    • Pour the mixture into a pan together with the sugar and vinegar. Bring to the boil and slowly stir. Once the mixture has reached boiling point, reduce to a simmer and cook for 30-40 minutes, stirring from time to time to prevent sticking. But in the meanwhile, taste to see if your chillies were hot enough or whether you need some more fish sauce of vinegar. I added a Madame Jeanette, cause my chillies lacked heat.
    • Pour the mixture into a warmed sterilized jars (about 2 x 250 ml). When cooled to room temperature, close the jars and refrigerate. You can keep this jam for quite some time. Weeks if not months.

    From: The Sugar Club Cookbook by Peter Gordon.

    Posted in Homemade | Tagged , , , , , , , | 9 Comments

    Dan Dan Noodles (担担面)

    Dan Dan Mian

    I call this the spaghetti Bolognese from Sichuan: very popular around the world and everybody makes his own version. With less or more ingredients, sesame-paste or not, peanuts or not, lots of oil, spicy, not spicy, pork or beef and sometimes more like a soup than a bowl of noodles. This is my version, spicy and packed full of flavors:


    RECIPE
    serves 4-6

    The order of assembling (not preparing) the dish is:

    Noodles
    400 g dried noodles
    Udon is nice, but any noodle made from wheat will do. You could even use Italian pasta. Cook according the instructions on the package.

    Cold sauce to mix with the noodles
    2 T sesame paste or tahin
    1 T sesame oil
    1 T light soy sauce or Japanese Soy sauce
    1 T Chinese black vinegar
    ½ T caster sugar (skip if you used the sweetened black vinegar)
    1½ T or more chili oil
    Just mix everything together, taste and increase any of the ingredients to your liking. You mix this with the cooked noodles, just enough to give it a light coating. Add a splash of water if it gets too sticky/starchy.

    Meat sauce to put on top of noodles
    400 g minced pork (or beef)
    2 T chopped garlic
    2 T chopped ginger
    2 T chopped spring onion or shallot
    1 T crushed/ground sichuanpepper
    2 T Shaoxing ricewine
    3 T chilibean sauce
    Stock/water
    Like any other meatsauce: panfry the minced meat until brown. Take it out of the pan or push to one side and panfry the garlic, ginger, onion and sichuanpeppers. When fragrant, mix with the minced meat and add the Shaoxing ricewine. Wait a few seconds to evaporate, then add the chilibeansauce. Fry for about 30 seconds, then add enough water/stock until the meat is just covered/moist. Simmer for half an hour or more. Season with soy sauce or salt if necessary, but be careful, somehow Dan Dan noodles can easily get too salty. If you like your sauce sticky like I do, you can thicken the sauce with a little cornstarch mixed with cold water.

    Garnish on top
    Chopped spring onion
    Stirfried ya cai *)
    Chopped coriander
    Roasted and chopped peanuts

    Assembling
    Coat the warm noodles with the cold sesame based sauce and divide into individual serving bowls. Add 1 or 2 big spoonfuls of meatsauce on top of the noodles. Sprinkle with spring onion, yacai, coriander and peanuts. Serve with a simple vegetable dish like stirfried Chinese broccoli (gai lan) with garlic sauce.


    *) Yacai is not easy or maybe I should say practically impossible to find. It’s pickled greens from a specific mustard cabbage (Brassica juncea, tsatsai). Other recipes say you can substitute it with zha cai (the pickled tuber/stem from the same plant) or Tianjin (preserved chinese cabbage), I wouldn’t, I’d just leave it out. But that’s because I’m not too keen on pickled stuff, yacai is an exception.

    Posted in Noodles, Pork | Tagged , , , , , , , , | 26 Comments

    Jerusalem Artichoke Soup


    I agree with Paul Bocuse that many heirloom vegetables should stay forgotten. But only the ones that ran out of fashion because of their taste, like turnips. Yuk! On the other hand, there are also vegetables that just became unpopular because they’re such a pain peeling/preparing or have unwanted side effects (gas), like Jerusalem artichokes. But Jerusalem artichokes, “aardperen” in dutch, actually taste very nice! They have a sweet and nutty flavor. You can serve them raw, thinly sliced with a lemony vinaigrette or make a super-easy, super-creamy soup.


    RECIPE

    500g Jerusalem artichoke
    1 medium potato
    1 smaller onion
    butter/oil
    ± 300 ml chickenstock or water
    milk or cream (optional)
    lemon juice
    salt & pepper

  • Peel the potato and Jerusalem artichokes and cut into similar size chunks (1,5 cm). After peeling a Jerusalem artichoke you should immediately plunge it in some water with a drop of lemon juice, vinegar or ascorbic acid to prevent it from turning gray, which happens quite quickly. The potato is only there to eliminate or reduce the gas-effect of the Jerusalem artichoke.
  • Saute the chopped onion in some oil or butter for 5-10 minutes until soft, translucent and starting to brown.
  • Add the potato and Jerusalem artichoke and saute some more.
  • Add enough of the chickenstock to cover the vegetables and simmer until they’re done/soft. It took me longer than I expected, about 40 minutes.
  • Blizz in a heat-proof blender until smooth and silky.
  • Add more chickenstock or milk/cream to your liking. I like my soup thick, but I know others don’t.
  • Add pepper and salt to your taste. Splash of lemon juice is nice too.
  • Okay, so that’s the soup.
    Now you want to pimp it.
    This is what I tried:

  • Smoked brown shrimp with samphire and chives (top photo)
  • Samphire with garlic croutons and chives (bottom photo)
  • Chopped roasted hazelnuts with chives. (photo here)
  • Some crispy bacon or smoked salmon will probably work too. Roquefort? Anything salty, I guess.
  • I blanched the samphire (zeekraal in dutch) by pouring boiling water over it in a sieve. Then dressed it with a little bit of olive oil and pepper. (never use salt with samphire) The shrimps I smoked for about 10 minutes on apple-wood in my stovetop smoker. I tried smoking them with and without their skin and decided that smoking them without is easier and just as good or maybe even better.

    Posted in Shellfish, soup | Tagged , , , , , , , , , | 7 Comments